
Over the past year, I've become weirdly infatuated with fans. The beginning might actually date back further than that (I rigged some fans to run off a 12V wall wart several years back to keep my media center cool), but things really took off when I became the proud owner of a fanless Core i5 Microsoft Surface that really should've had a fan (and it turns out that even the fan-full Core i7 model needs a fan). Short story long, I've bought probably 15-20 fans over the last year. Quick shout out to Noctua's eBay shop, where they ship straight from Austria (helpful for when Amazon and Newegg are out of stock). #covidhobbies #onlyfans
Most recently, a fan on my AMD Radeon VII started sounding sickly: at speeds above ≈70%, there was a high-pitched whine. Unfortunately, the GPU is no longer in production and I was unable to find OEM replacement parts. "But a fan is a fan," you're thinking. Short of buying some off-brand replacement fans off AliExpress or buying a GPU "for parts" off eBay (unappealing since even seemingly dead GPUs seem to be selling for $450+), it seemed I was out of luck.
Just kidding, I have a 3D printer. Watch out, world.
The no-name fans off AliExpress probably would have been fine (though they certainly lack the stellar name recognition of the original "First D" brand fans). However, the GPU has always been a little loud, so it seemed this was an opportunity for improvement on many fronts. That said, after finding that AliExpress link, fair warning that what follows is not remotely cost-effective ($14 + free 3-6 week shipping versus $60+ on three fancy-ass chromax.black.swap Noctua fans). But, as momma always heard me say: "anything worth doing is worth overdoing."
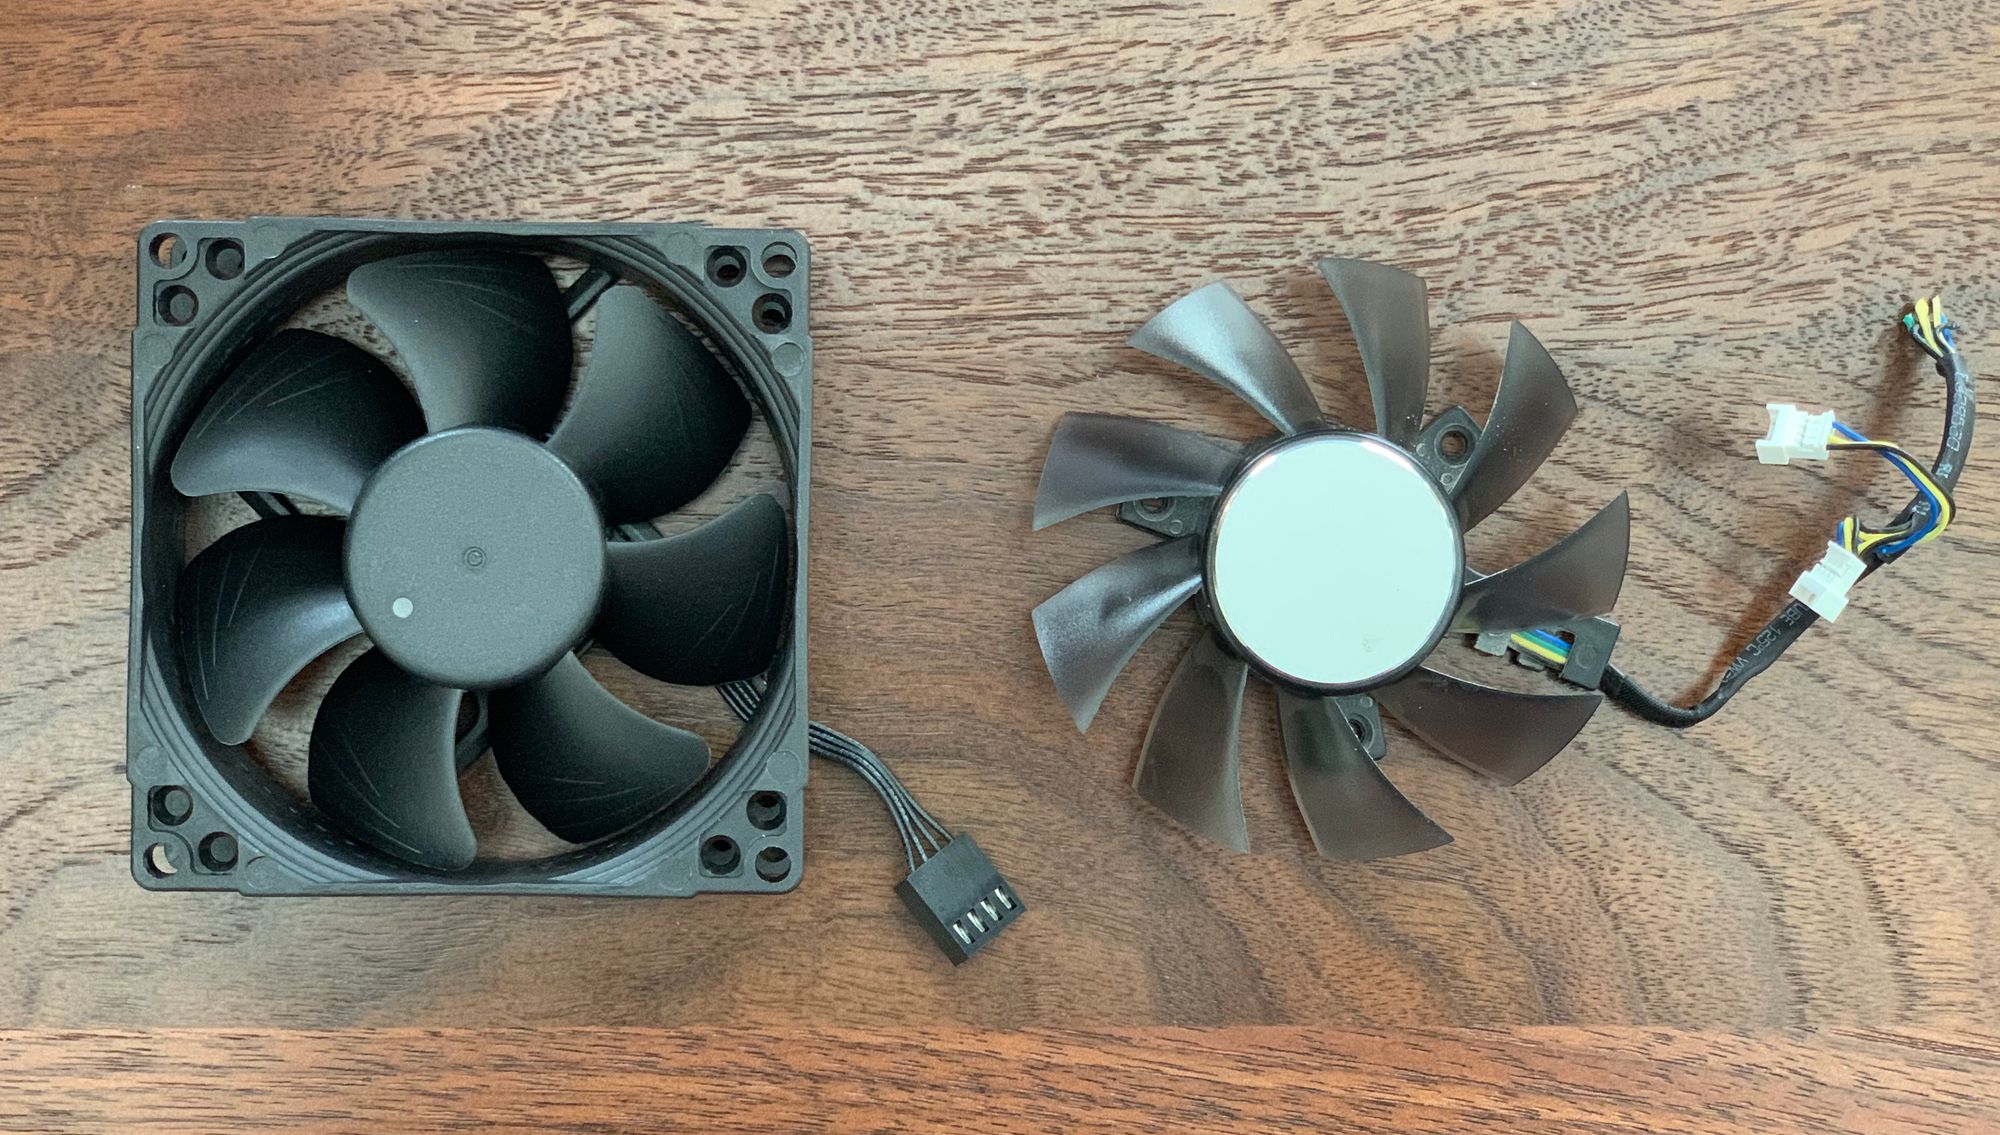
To start, I had to find some potential replacement fans. The original fans are approximately 75mm x 15mm fans. Noctua makes a 92mm fan that is 14mm thick, but unfortunately the regions in the GPU shroud are too small to accommodate such a large diameter. The next best option turned out to be their 80mm fan, which is 25mm thick.
I had also done some research to see what I was up against. First, this excellent video from GamersNexus was helpful in disassembling the Radeon VII. Second, I scrubbed through this disassembly video of a Noctua fan. The Noctua video made the disassembly it look harder than it actually is, and I don't know whether a heat gun would actually make things easier.
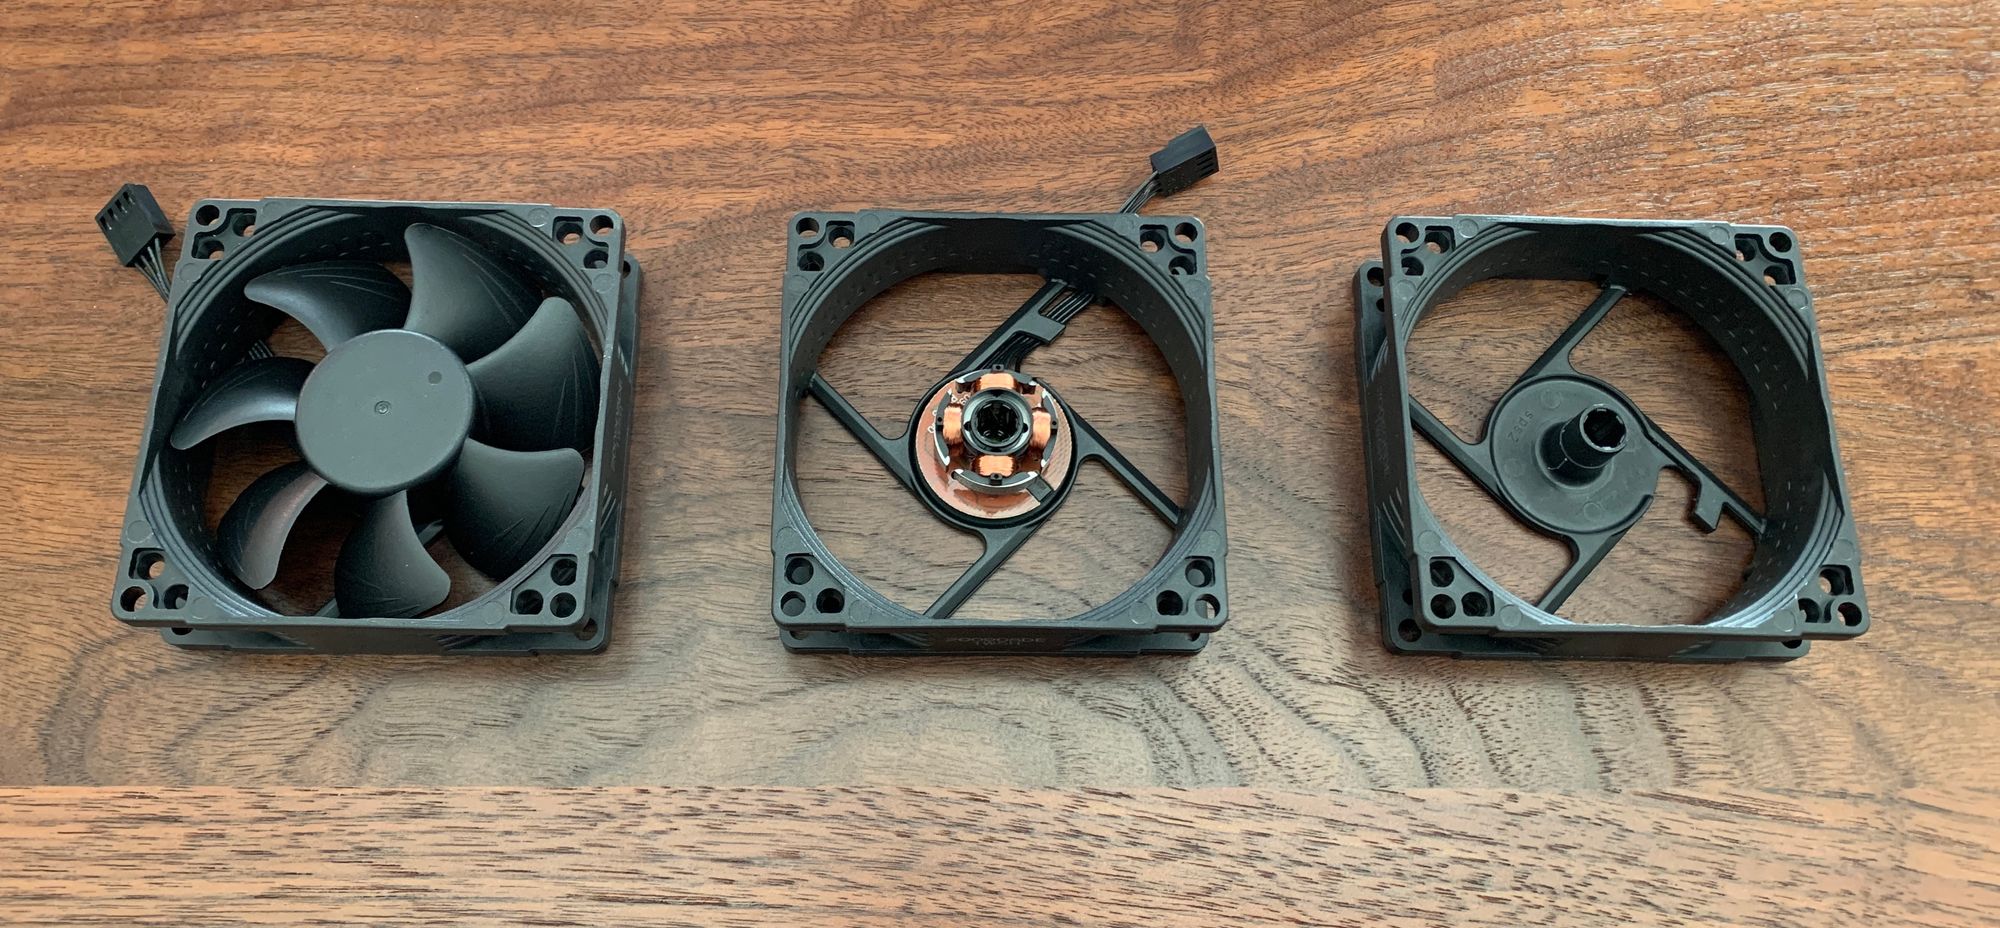
In short: there is a bushing that keeps the shaft of the fan in place, and the bushing is retained by friction. Knowing this, I was able to disassemble the fan by firmly pushing the blades out of the case from the back. This is different than other fans I have encountered, where there is a lock ring(?) behind the center label of the fan that can be removed to free the shaft from the bushing. No need to remove the stickers here! (Quick note: I doubt this technique applies to all their fans, since the 120mm fans seem to use a different construction.)
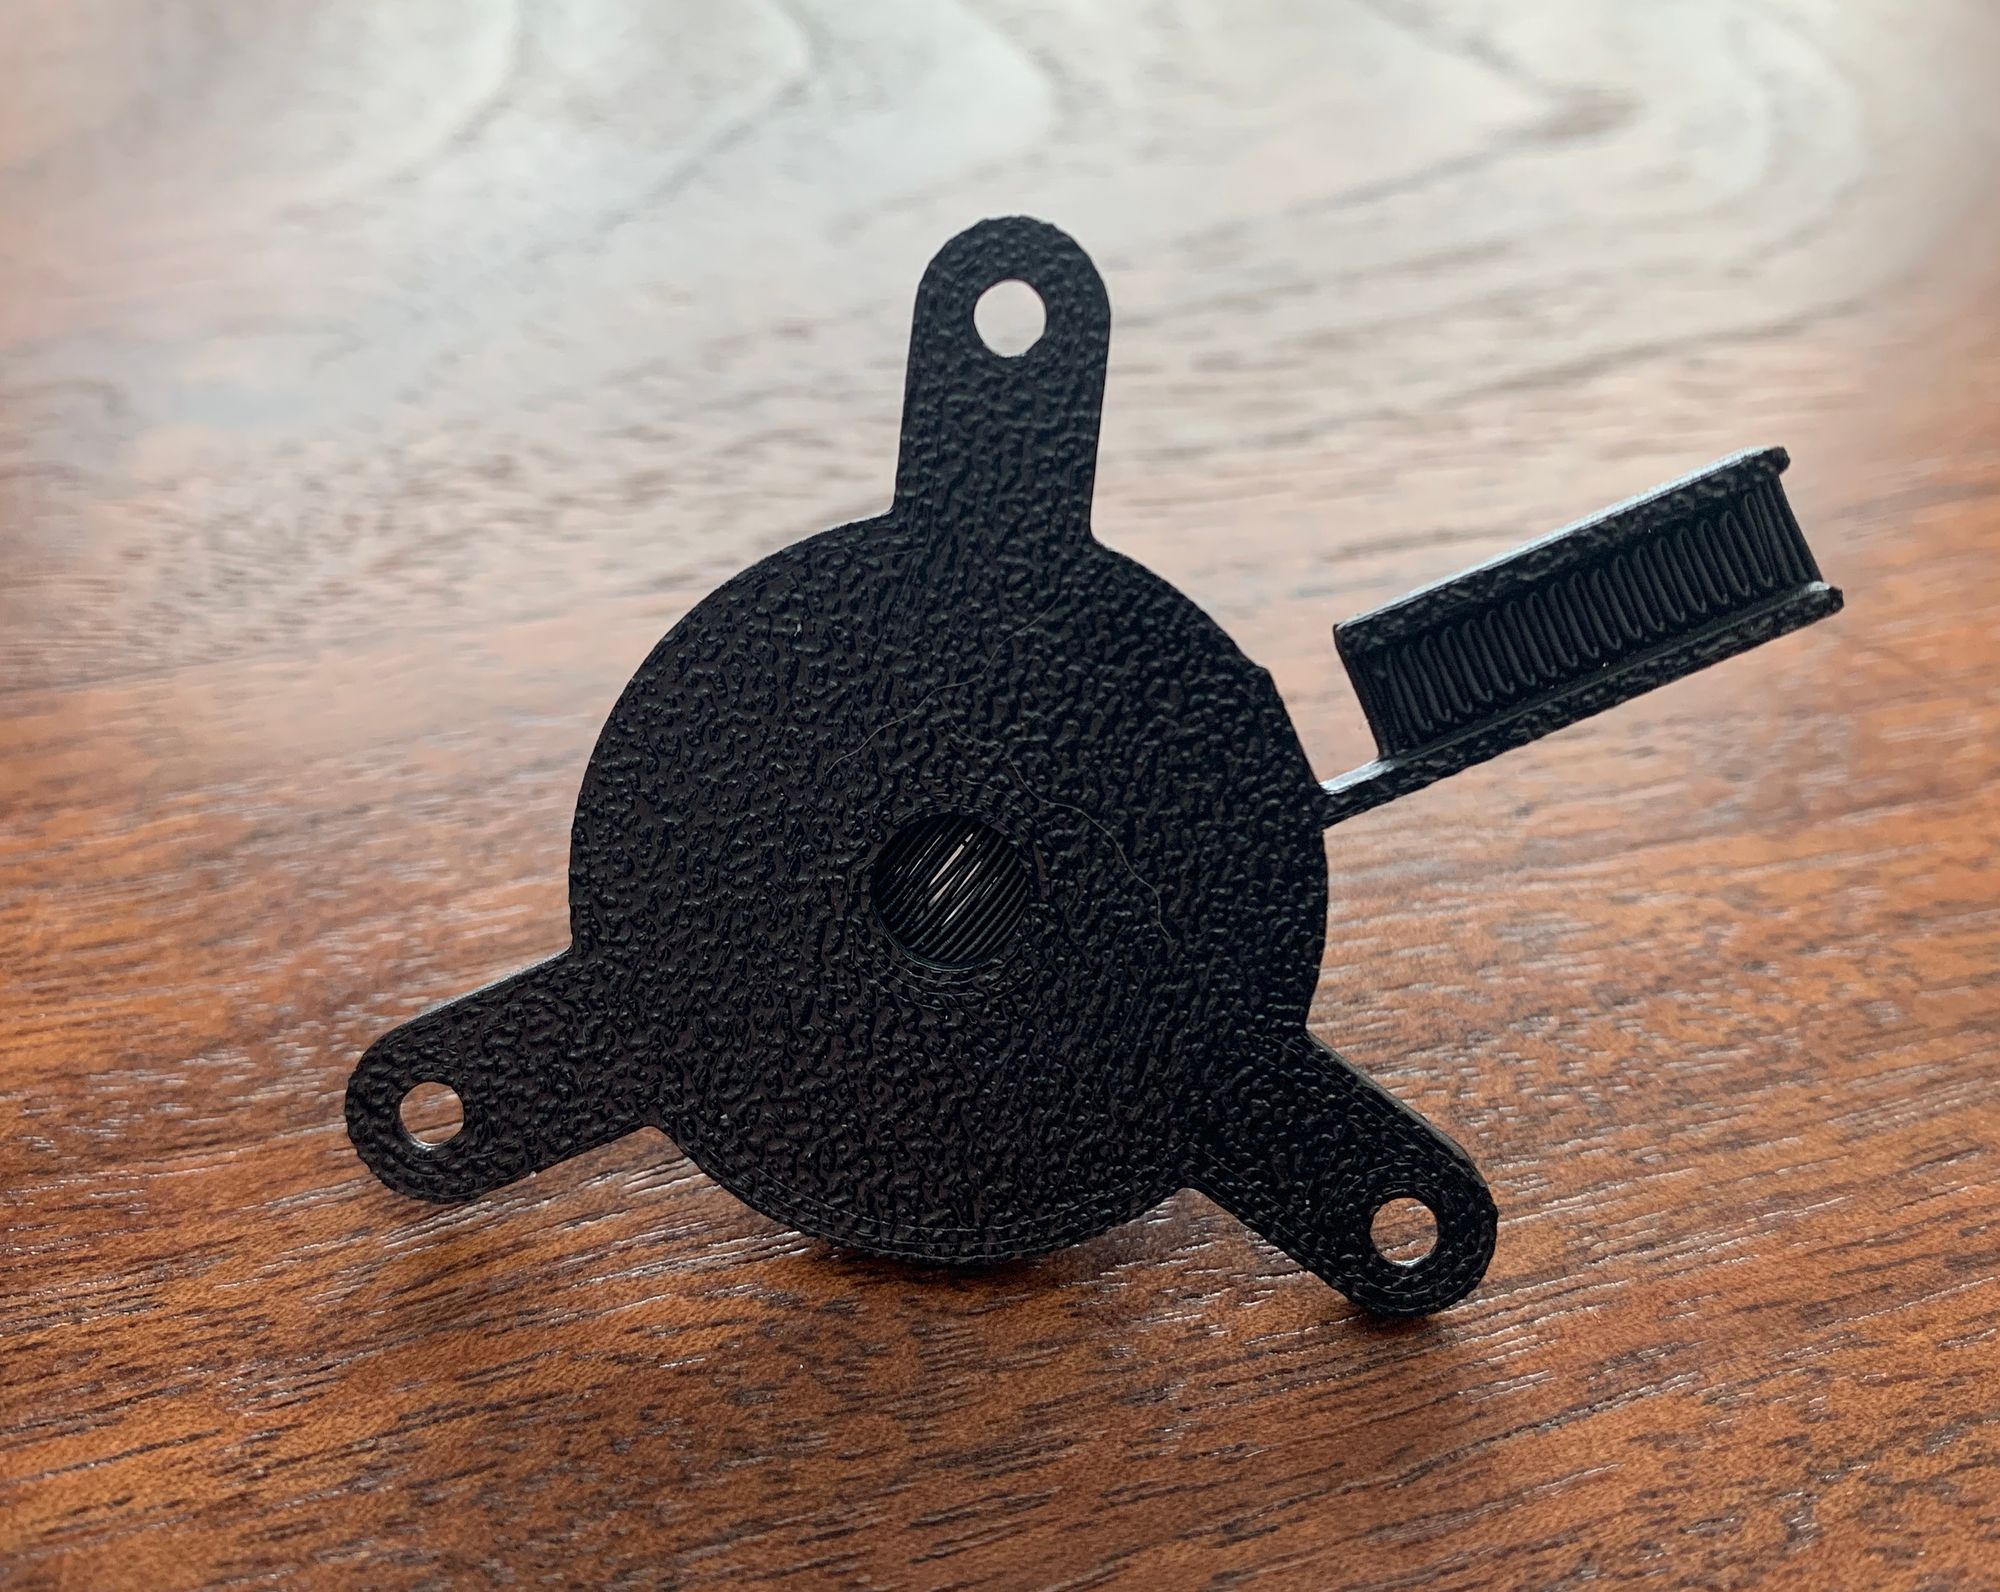
The next stage of the project was to model a replacement base to hold the PCB in place with respect to the fan rotor. I expected the modeling process to be somewhat tedious and have a low margin for error, given the relatively tight fit between the electromagnets on the PCB and the corresponding magnet in the fan rotor. Thankfully, duplicating Noctua's design was actually surprisingly simple and relatively forgiving.
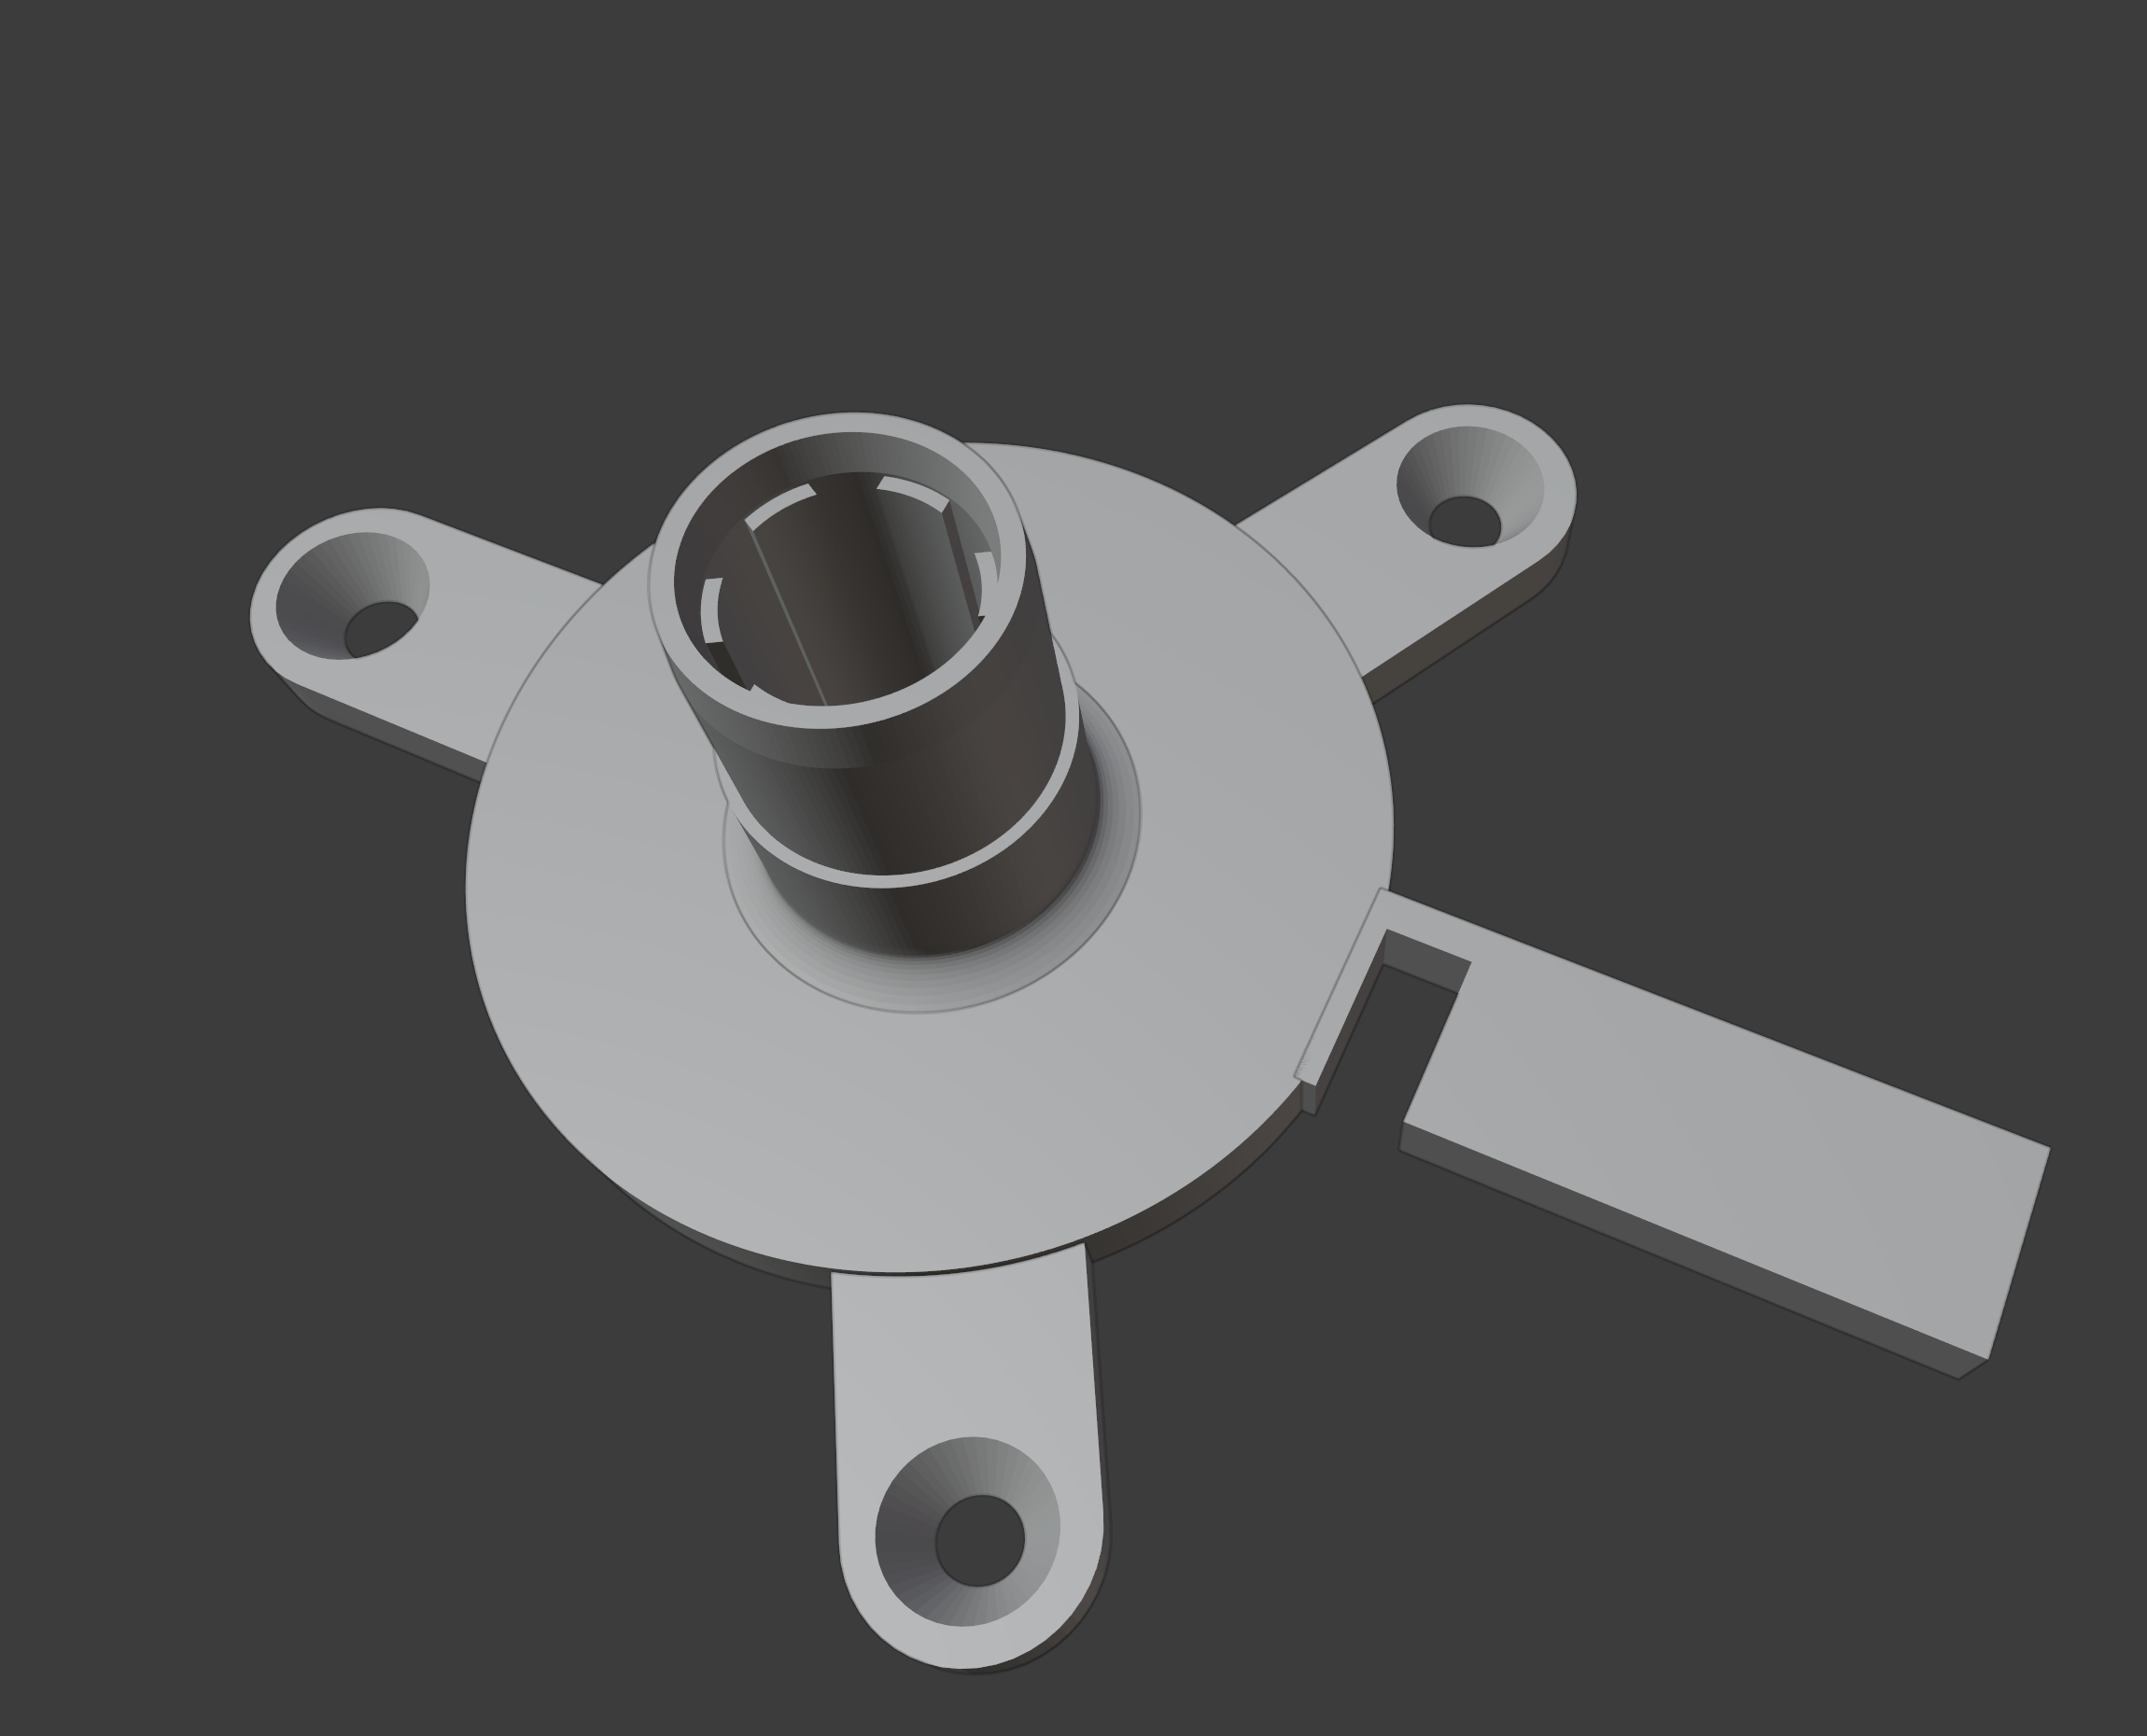
I ended up printing five or six iterations of the design, and every single version was functional. Definitely not the norm. It may eventually be worth writing a post about my approach to 3D modeling, but generally I start with a relatively simple / naïve model and iterate from there. It helps make sure I get the dimensions right along the way, and I can also iron out any kinks introduced by FDM printing.
For example, I had expected the top of the model to be difficult to print given its relatively thin walls and quick print time (some things get melty when that's the case), but it again turned out to be a non-issue. How often and how quickly I can iterate depends on how long the print time is, but thankfully this part only takes 25-30 minutes to print.
There is one trick worth mentioning here, which I think I picked up from Maker's Muse on YouTube. The original fan has a magnet embedded at the bottom of the rotor shaft. The fan works fine without the magnet, but I assume the magnet is to keep the rotor in place rather than having it inadvertently ride up during operation.
Being anally receptive retentive, I decided to duplicate this feature anyway, using a 6mm x 1.5mm cylindrical cavity to retain a neodymium magnet. The magnet cavity then gives way to a differently shaped, but narrower, cavity in which the shaft of the rotor can move freely.
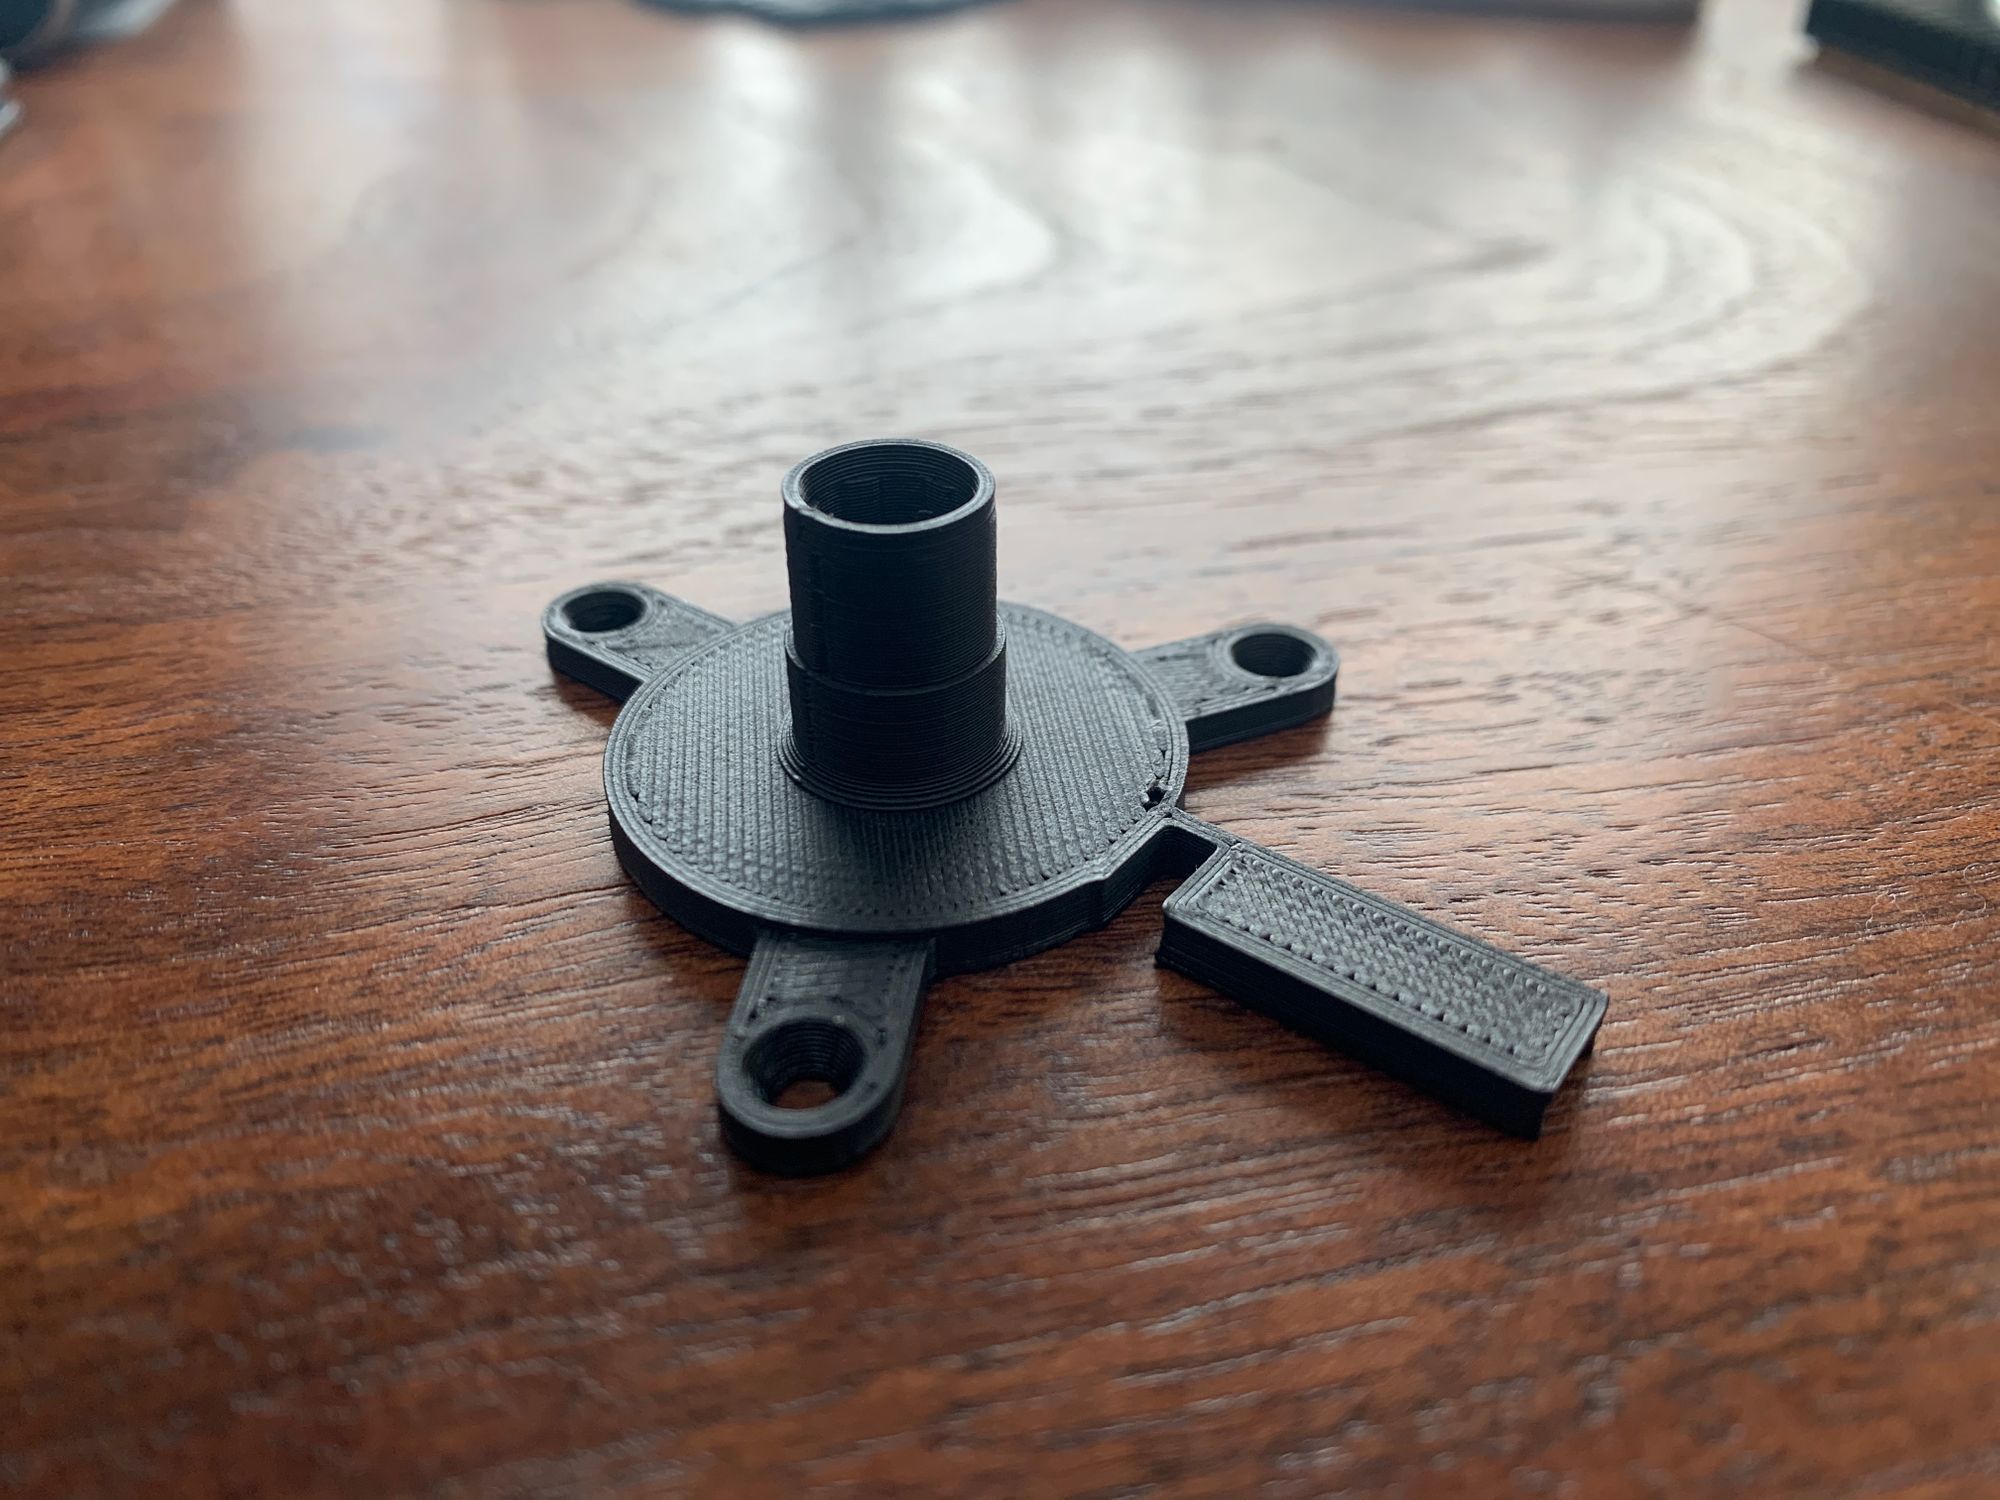
If you are unfamiliar with 3D printing (and more specifically FDM 3D printing), moving from a big hole to a small hole is problematic, because the walls for the smaller hole will be printed when the nozzle is over thin air. The trick here is to leave a single solid layer between the boundary for the magnet cavity and the shaft cavity, so there is a thin layer of plastic upon which to build the walls for the shaft cavity.
The sacrificial layer is easy to clean up once the print is done, for example by puncturing it with a screwdriver. I also considered entirely closing off the two cavities from one another, but it turned out to be helpful during assembly and testing for reasons discussed below.
Anyways, it was upon attempting to assemble the fan using the 3D-printed part that I decided this project was worthy of a blog post. To this point, I hadn't attempted to disassemble the rotor assembly, partly because I hate grease (truly, can't stand it), but also because I was worried it would affect the fan's operation.
{I just returned to finish this post after three months away from it, so I don't fully remember the epiphany that I was building up to here}
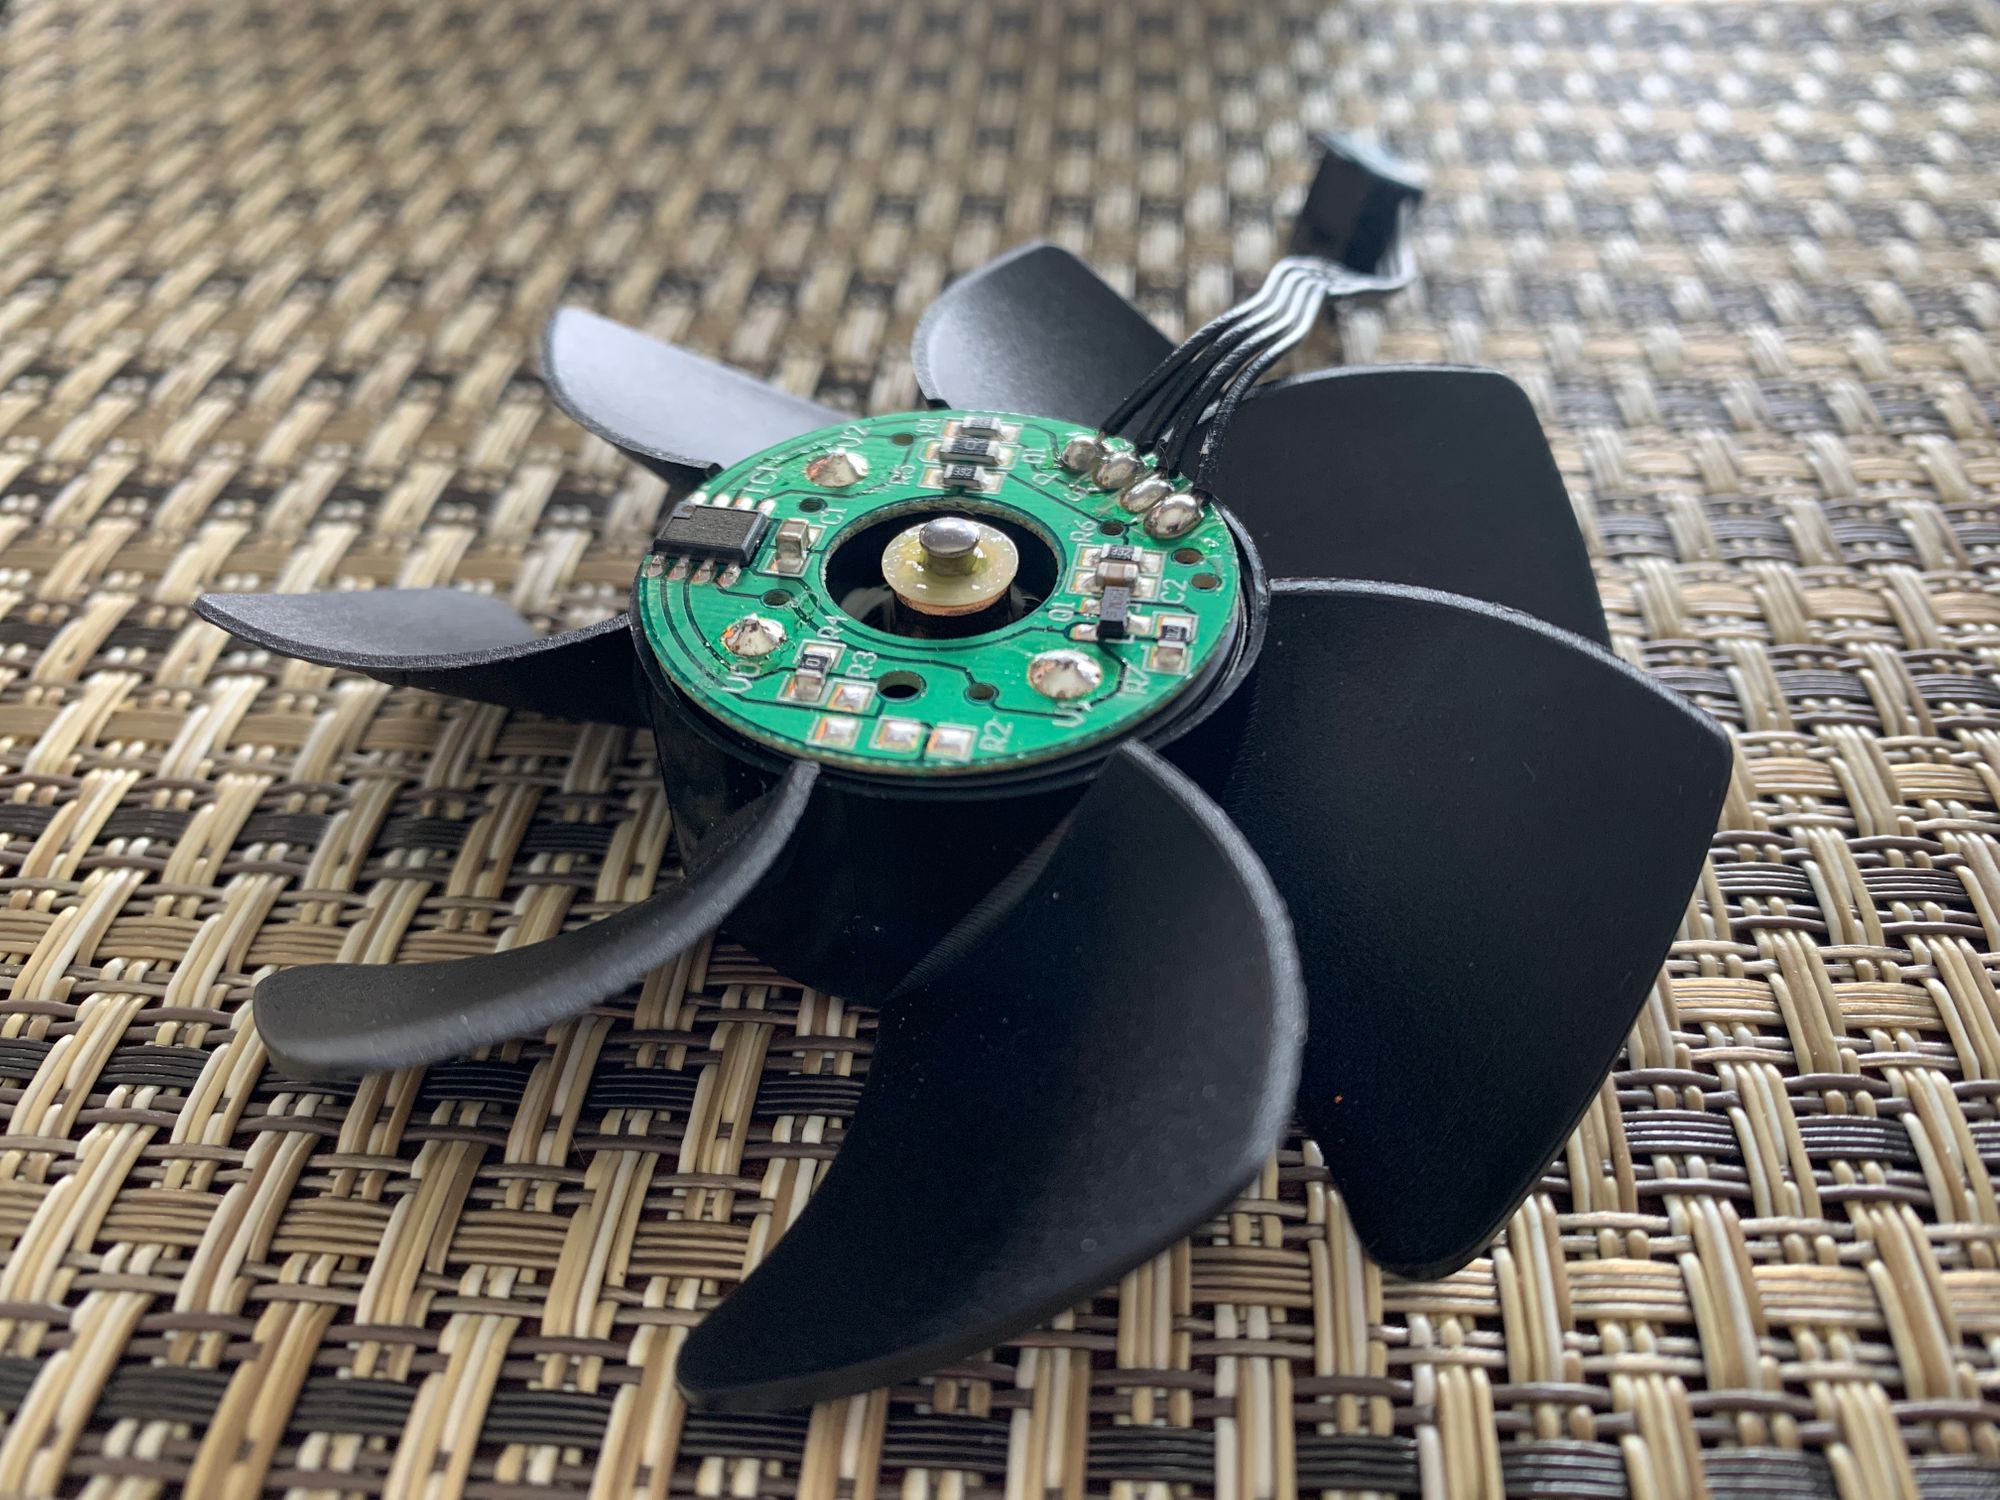
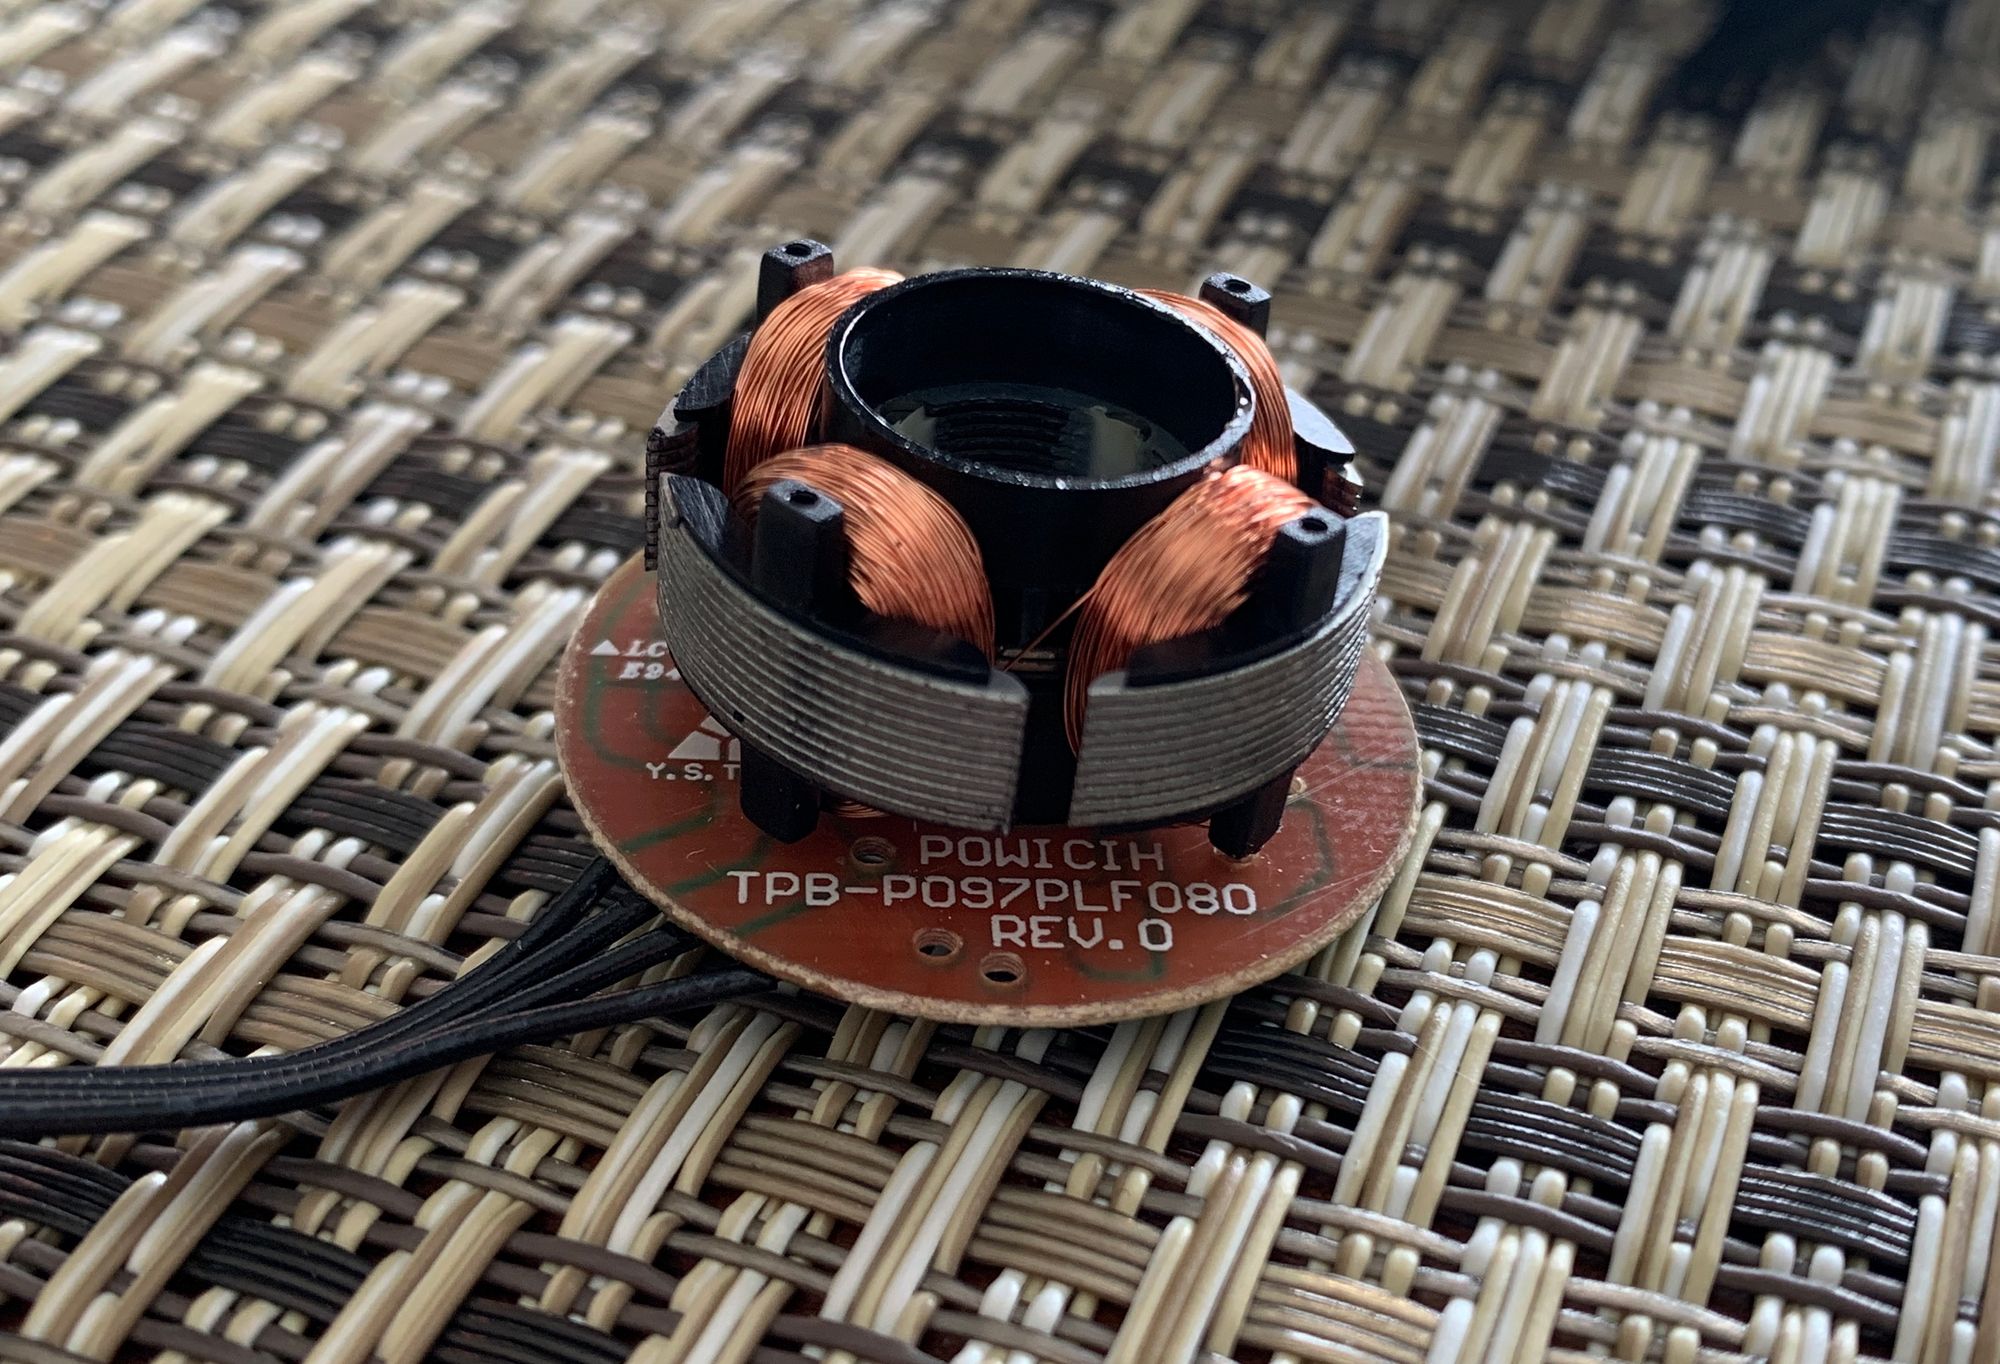
In short, the rotor assembly is comprised of four-ish pieces: the blades / hub / shaft (effectively all once piece), a ring that sits between the bushing and the hub, the bushing, and a retention washer. Alas, I wish I had a picture of the assembly on its own. In the picture above, you can at least see (from top to bottom): the shaft, the retention washer (with grease!), and a small portion of the copper bushing.
In my initial reassembly attempts, I put the PCB (above) onto the 3D-printed part and pushed the whole rotor assembly into the shaft cavity. In doing so, my concern was that the ring between the bushing and the hub (which I assume is to limit grease egress from the shaft cavity) was not positioned correctly. And, based on how the fan rotated in subsequent testing, it seemed I was right: the ring was not seated properly and was in contact with the hub.
It seems that the only way to properly assemble the fan is to break down the rotor assembly and put its constituent parts into the 3D-printed part one by one. Trying this technique, the retention washer sat nicely at the bottom of the shaft cavity (which I was able to position using tweezers, thanks to the hole between the magnet cavity and the shaft cavity), followed by the bearing. I was then able to press the ring onto the top of the cylinder. It was a perfect, snug fit. I slid the shaft into the bushing and through the retention ring, at which point the rotor assembly was properly reassembled within the 3D-printed part.
Weird Noctua erotic fan fanfic aside, the result worked perfectly. And so, my epiphany: in modeling a different base for the fan, I'd gained a better understanding for not only the parts that form the fan, but also how the fan is assembled and some of the associated engineering decisions.
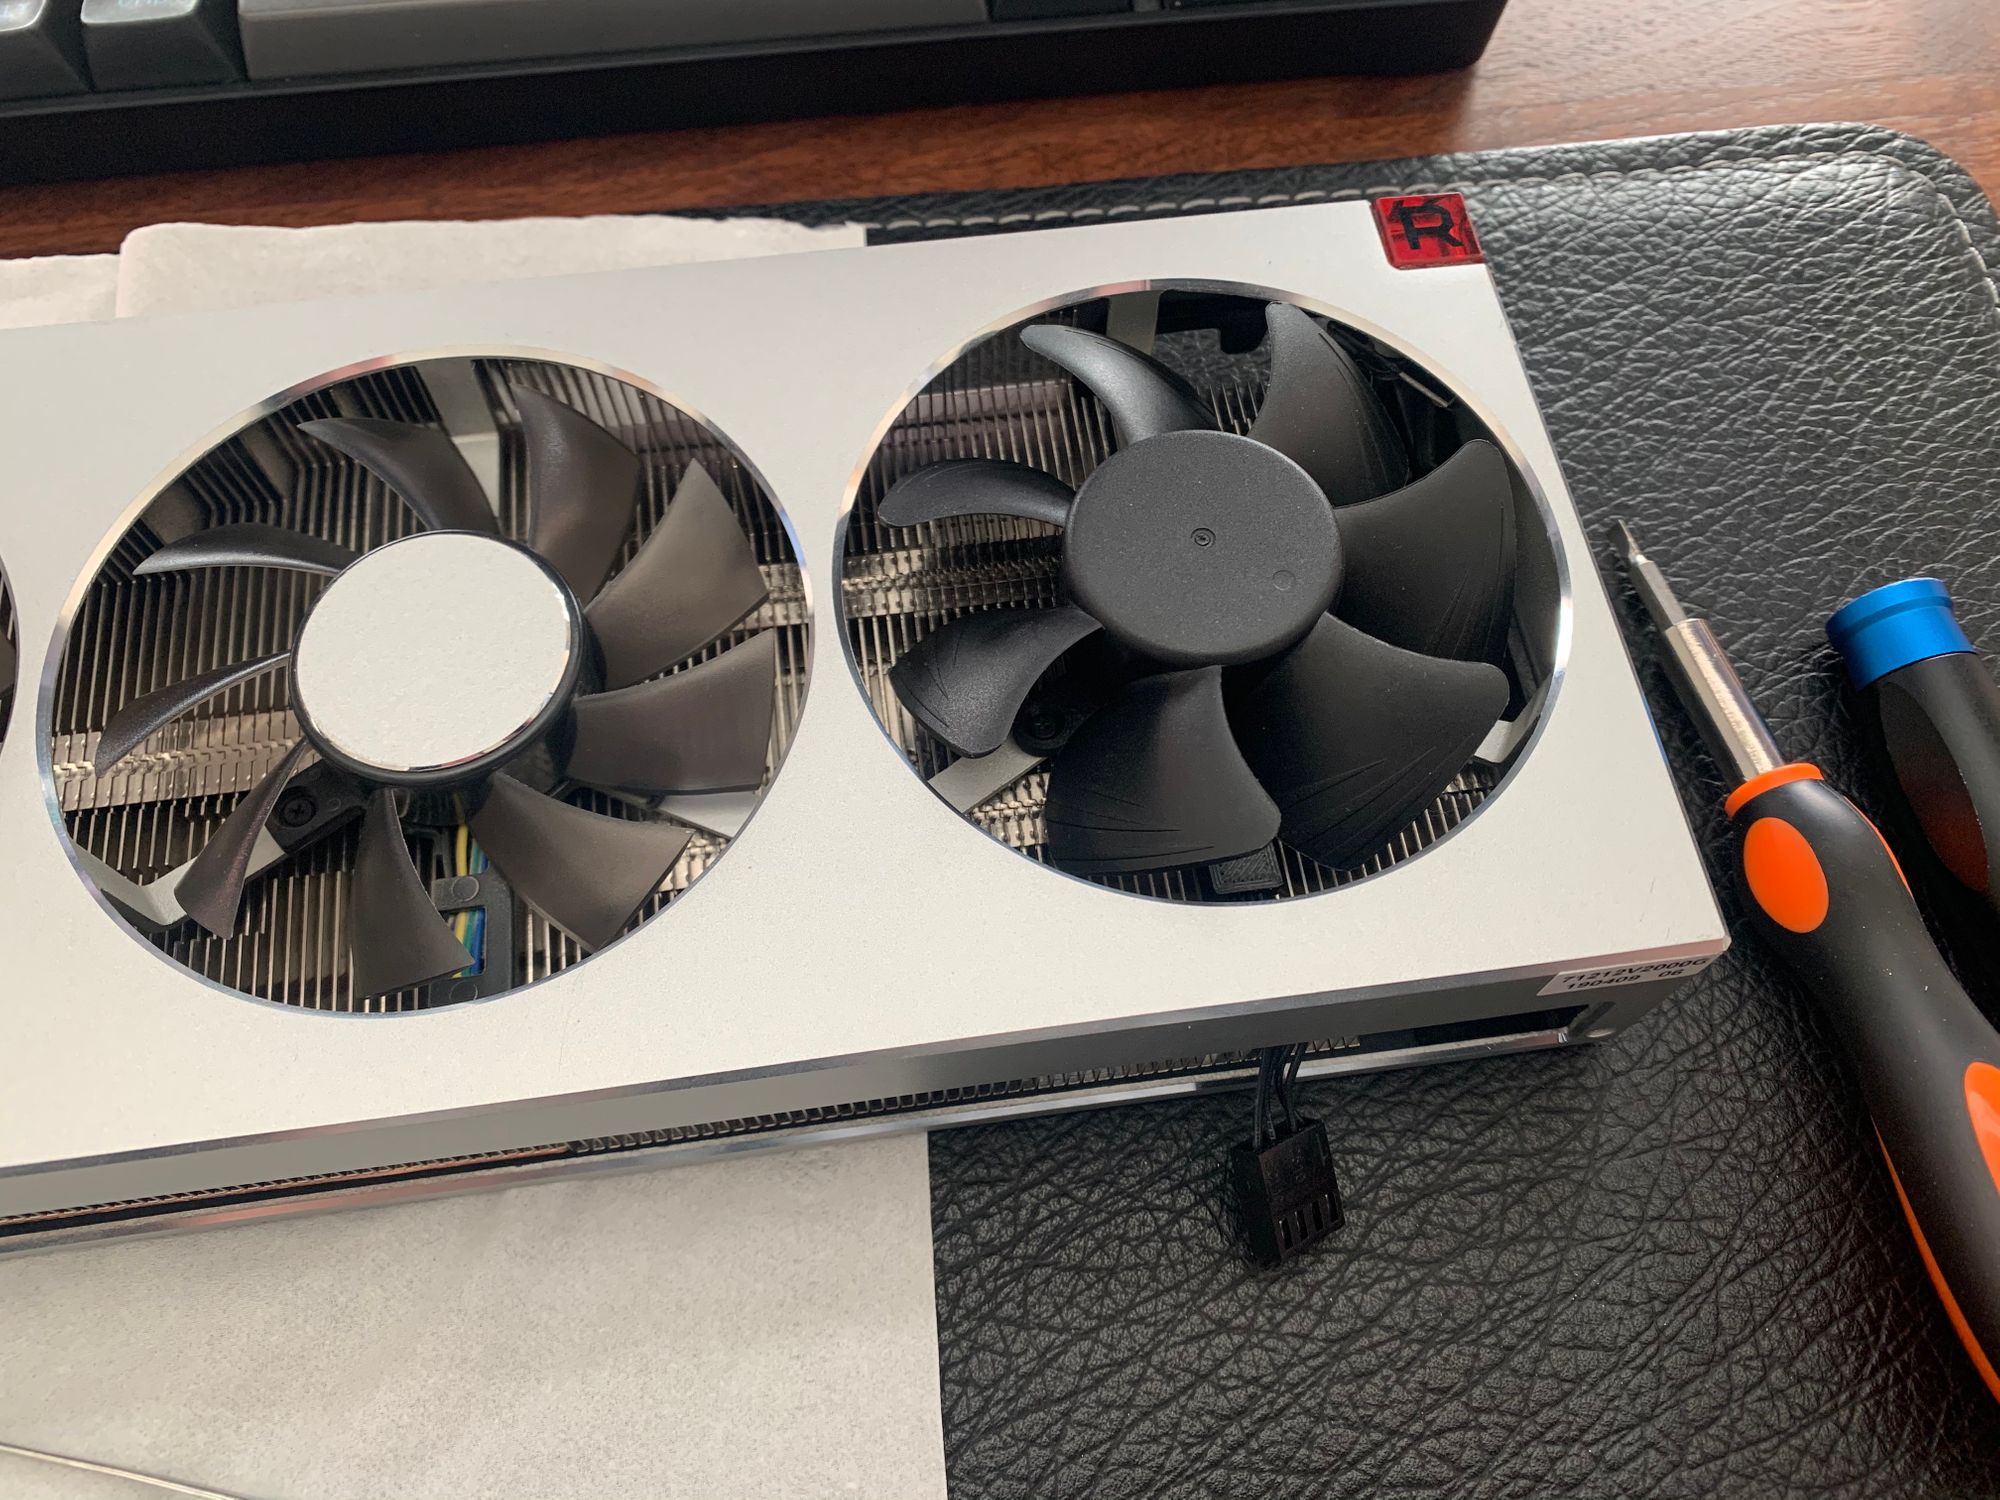
I made two more fans, soldered them all together, and used a GPU fan connector to reassemble the graphics card. The result (#restofthefuckingowl)? Well, having used the fan for nearly three months now (thanks, procrastination!), I can say the project was a resounding success.
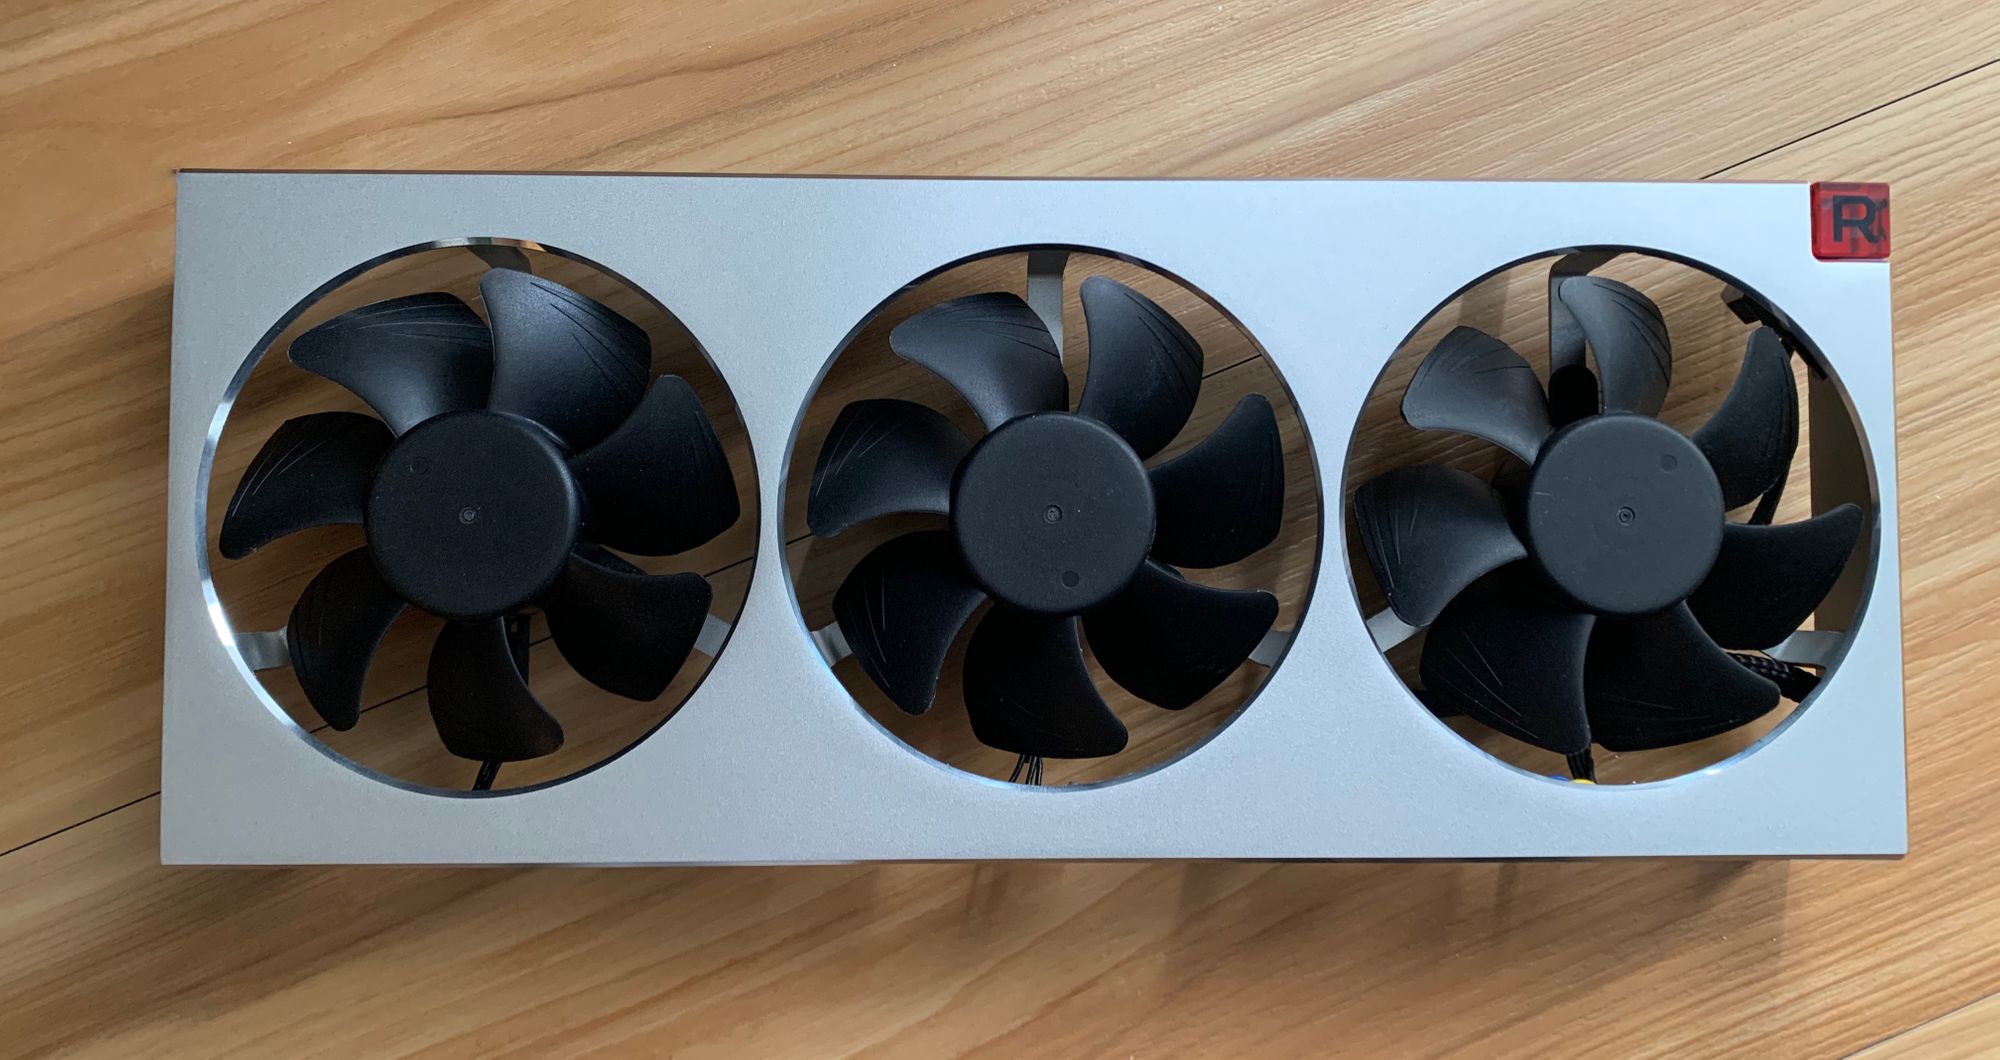
I will say that the BIOS of the Radeon VII has no idea what to do with the RPM reported by the new fans, so running the fans at 100% registers as only 60%. Overall, I can't say for a fact that cooling performance has increased, but, even at 100% 60%, the Radeon VII stays quite cool and it is so, so much quieter than the stock fans.